Creating a Functional Workspace: Tool Bench Organization Tips
A well-organized workshop is the cornerstone of any successful do-it-yourself (DIY) enthusiast's projects. Whether you're a seasoned woodworker, metalworker, or a hobbyist looking to tackle weekend projects, having a functional and organized workspace is key to efficiency and creativity. In this comprehensive guide, we'll delve into practical and innovative DIY workshop organization hacks, focusing on tool bench organization tips to help you create a workspace that not only looks tidy but also enhances your overall productivity.
Table of Contents:
- Understanding the Importance of Workshop Organization
- Creating an Efficient Tool Bench
- Storage Solutions for Small Parts and Accessories
- Maximizing Space in a Compact Workshop
- Workshop Aesthetics: Balancing Form and Function
- Maintaining Organization Over Time
I. Understanding the Importance of Workshop Organization
Before we dive into the specific hacks, let's take a moment to understand why workshop organization is crucial. An organized workspace not only saves time but also contributes to safety, precision, and overall project satisfaction. Here are a few key reasons to invest time and effort into organizing your DIY workshop:
Efficiency: An organized workspace allows you to quickly locate tools and materials, reducing the time spent searching for what you need.
Safety: Cluttered workspaces can lead to accidents. A well-organized workshop minimizes the risk of tripping over tools or having sharp objects lying around.
Precision: A tidy environment enables you to work with greater precision, ensuring that your projects turn out as planned.
Inspiration and Creativity: A clean and organized space can inspire creativity, making it easier to brainstorm and execute new ideas.
Now that we understand the importance of workshop organization, let's explore some practical DIY hacks to transform your tool bench into a well-ordered haven for creativity and productivity.
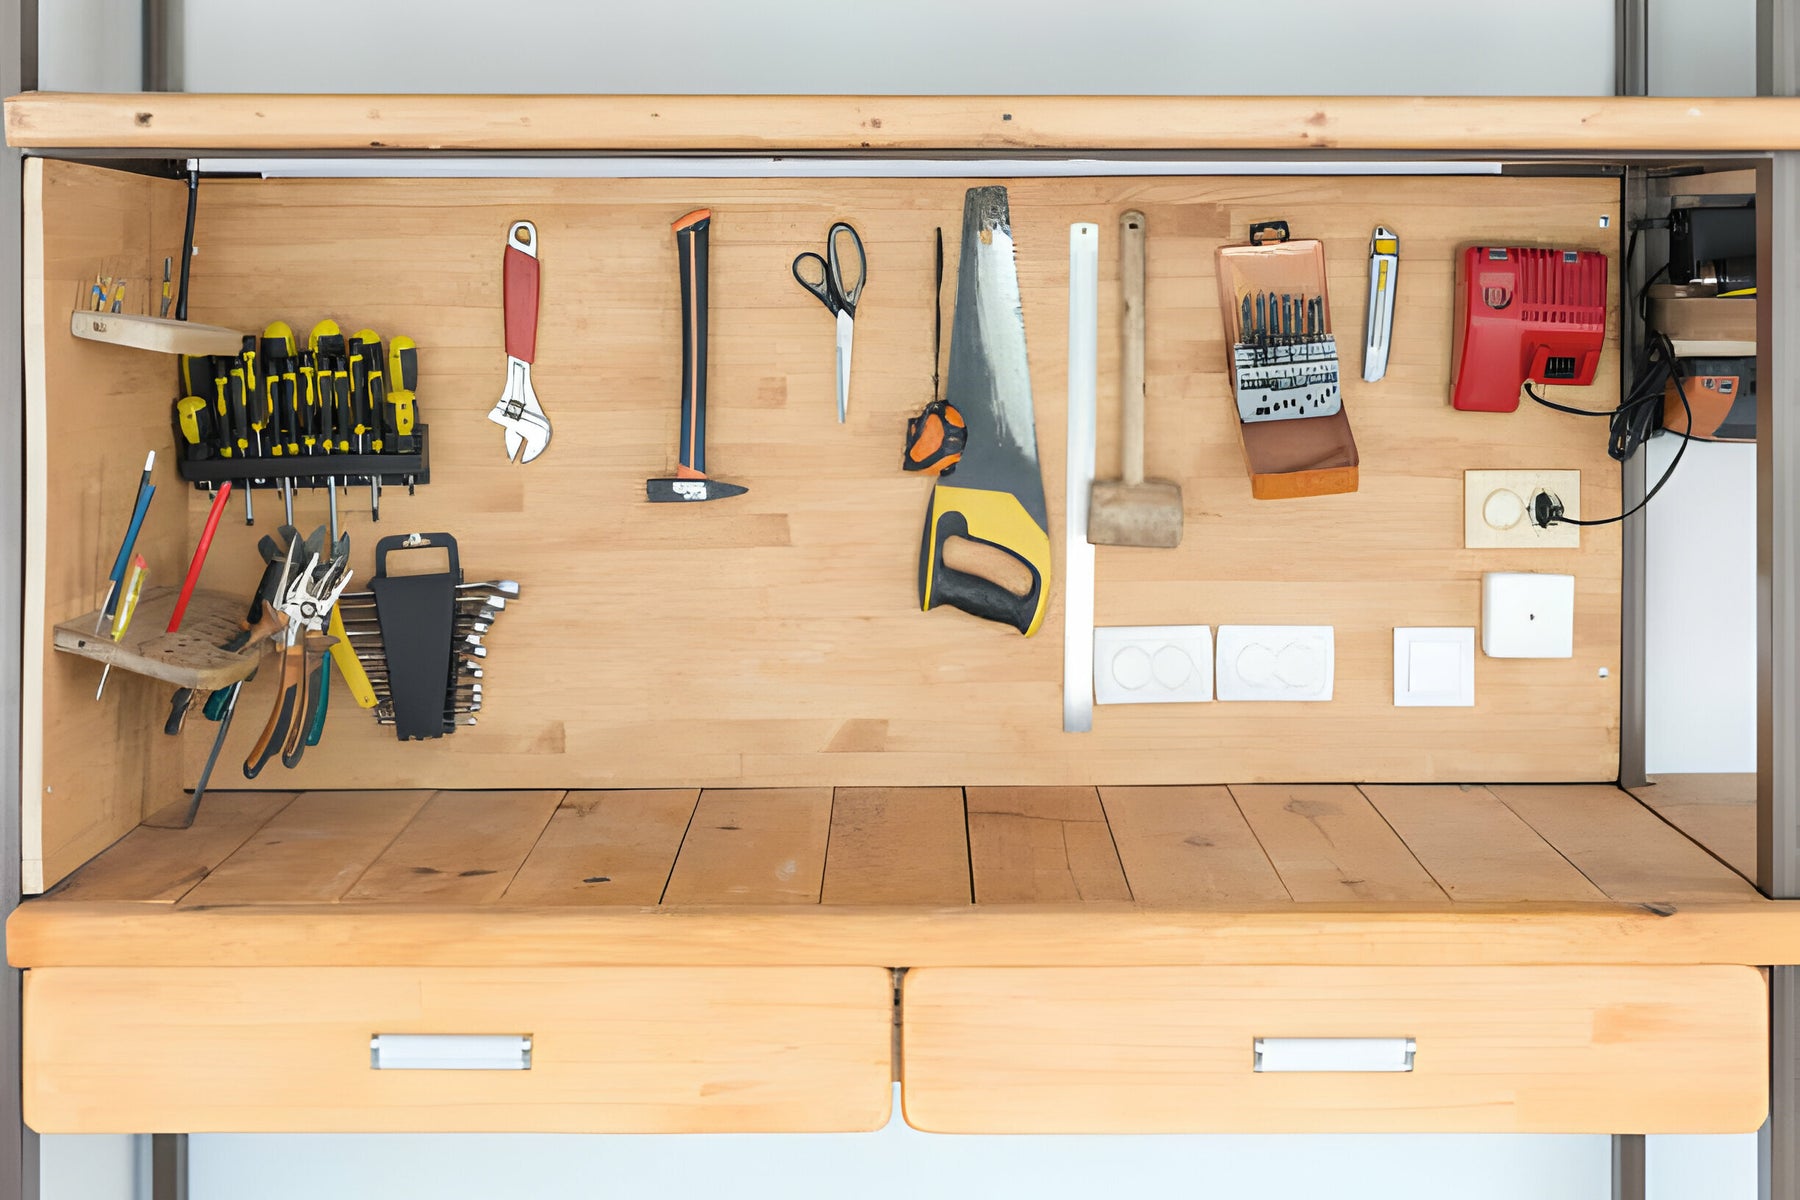
II. Creating an Efficient Tool Bench
Your tool bench is the epicenter of your DIY workshop, and organizing it effectively is crucial for a seamless working experience. Here are some practical tips to enhance the functionality of your tool bench:
Strategic Tool Placement: Group similar tools together based on functionality and frequency of use. Keep frequently used tools within arm's reach, and less commonly used tools can be stored in drawers or on shelves.
Pegboard Mastery: Install a pegboard above your tool bench to maximize vertical space. Utilize hooks and pegs to hang tools such as hammers, pliers, and screwdrivers, keeping them easily accessible and visible.
Custom Tool Holders: Craft custom holders for specific tools using PVC pipes, wooden blocks, or metal brackets. This ensures that each tool has a designated spot, reducing the chances of misplacement.
Magnetic Magic: Attach magnetic strips to the sides of your tool bench to hold metal tools securely. This not only keeps them organized but also makes them readily available for use.
Drawer Dividers: Use drawer dividers to create compartments for different tools. This prevents small tools from getting lost in the depths of a drawer and makes it easier to locate items quickly.
III. Storage Solutions for Small Parts and Accessories
Beyond the larger tools, DIY workshops are often filled with an assortment of small parts, screws, and accessories. Effectively organizing these items can make a significant difference in your overall workspace efficiency. Here are some hacks to keep your small parts in order:
Modular Storage Bins: Invest in modular storage bins with adjustable dividers. These versatile containers can be customized to accommodate various sizes of screws, nuts, bolts, and other small parts.
Mason Jar Madness: Repurpose empty mason jars as storage containers for nails, screws, and other small items. Attach the lids to the underside of shelves for a space-efficient and visually appealing solution.
Transparent Drawers: Opt for transparent drawers or containers to easily identify the contents without having to open each one. This saves time and ensures you grab the right part for the job.
Labeling System: Implement a labeling system for drawers and containers. Clearly label each storage space to streamline the process of finding specific parts and prevent confusion.
IV. Maximizing Space in a Compact Workshop
Not everyone has the luxury of a spacious workshop, but that doesn't mean you can't create an organized and efficient workspace. Let's explore some hacks to maximize space in a compact DIY workshop:
Foldable Workbenches: Consider installing foldable workbenches that can be tucked away when not in use. This creates extra floor space for other activities and makes the workshop more versatile.
Wall-Mounted Shelves: Take advantage of vertical space by installing wall-mounted shelves. Store items like paint cans, adhesives, and other supplies on these shelves to free up valuable workspace.
Mobile Storage Units: Invest in mobile storage units with wheels to easily move tools and supplies around the workshop as needed. This flexibility is especially useful in smaller spaces where dedicated workstations might not be feasible.
Toolbox on Wheels: If your workshop serves multiple purposes, having a toolbox on wheels allows you to move your essential tools easily from one area to another. This is particularly handy in garages or shared spaces.
V. Workshop Aesthetics: Balancing Form and Function
While functionality is paramount in a workshop, aesthetics should not be overlooked. A well-designed and visually pleasing workspace can enhance your overall experience and motivation. Here are some tips to balance form and function:
Color-coded Organization: Assign specific colors to different tools or categories, creating a visually appealing and organized look. This not only adds a touch of creativity but also makes it easier to locate tools at a glance.
DIY Tool Rack Art: Turn your tool rack into a piece of art by arranging tools in a visually pleasing and intentional manner. This adds a personalized touch to your workspace while keeping tools easily accessible.
Inspiration Board: Create an inspiration board or wall where you can pin project ideas, sketches, and motivational quotes. This not only adds a decorative element but also serves as a constant source of inspiration.
Task Lighting: Install task lighting above your workbench to illuminate your projects effectively. Choose lighting fixtures that complement the overall aesthetic of your workshop, adding both functionality and style.
VI. Maintaining Organization Over Time
Organizing your workshop is not a one-time task; it requires ongoing effort and discipline. Here are some tips to maintain the organization of your DIY workshop over time:
Clean as You Go: Develop the habit of cleaning and organizing as you work on projects. Put tools back in their designated spots and dispose of waste materials promptly.
Regular Decluttering Sessions: Schedule regular decluttering sessions to reassess the layout and organization of your workshop. Identify items that are no longer needed and either discard or donate them.
Inventory Management: Keep a running inventory of your tools and supplies. This helps you track what you have, identify missing items, and avoid unnecessary purchases.
Update and Adapt: As your projects and tools evolve, be open to updating and adapting your organization system. Flexibility is key to ensuring that your workshop remains functional and tailored to your needs.
Conclusion
Mastering the art of DIY workshop organization is not just about tidying up; it's about creating a space that enhances your efficiency, safety, and overall enjoyment of the crafting process. By implementing the hacks discussed in this guide, you can transform your tool bench and entire workshop into a well-organized haven that inspires creativity and fosters productivity. Remember, the key to successful workshop organization is a combination of thoughtful planning, practical solutions, and the commitment to maintaining order over time. Now, roll up your sleeves and embark on the journey to a more organized and efficient DIY workspace. Your future projects will thank you.
Related Article: DIY Workshop Organization Hacks
Related Topics
How to Choose the Right Tap and Die Set for Your Needs
Choosing the right tap and die set can be a daunting task, especially if you're new to threading ...
Read More
Maintenance Tips for Prolonging the Life of Your Tap and Die Set
Maintaining your tap and die set is essential for ensuring its longevity and effectiveness. These...
Read More
Top 5 Uses for Tap and Die Sets in Everyday Repairs
When it comes to versatile tools for repair and maintenance, Tap and Die Sets are among the most ...
Read More