Top Tips to Avoid Common Bench Vise Mistakes
Are you tired of making common mistakes when using your bench vise? Whether you're a seasoned DIY enthusiast or just starting out, it's crucial to understand the proper techniques to avoid costly errors. In this blog post, we'll delve into the top tips for steering clear of common bench vise mistakes. From over-tightening to improper installation, we'll cover it all. Stay tuned as we explore the fundamentals of bench vise usage and maintenance, ensuring that your projects run smoothly and efficiently.
Understanding the Basics: The Purpose and Proper Use of a Bench Vise
A bench vise is an essential tool for any workshop or garage. Understanding its purpose and learning how to use it properly is crucial for achieving accurate and safe results. In this section, we will explore the basics of a bench vise, its primary functions, and the correct techniques for utilizing it effectively.
What is a Bench Vise?
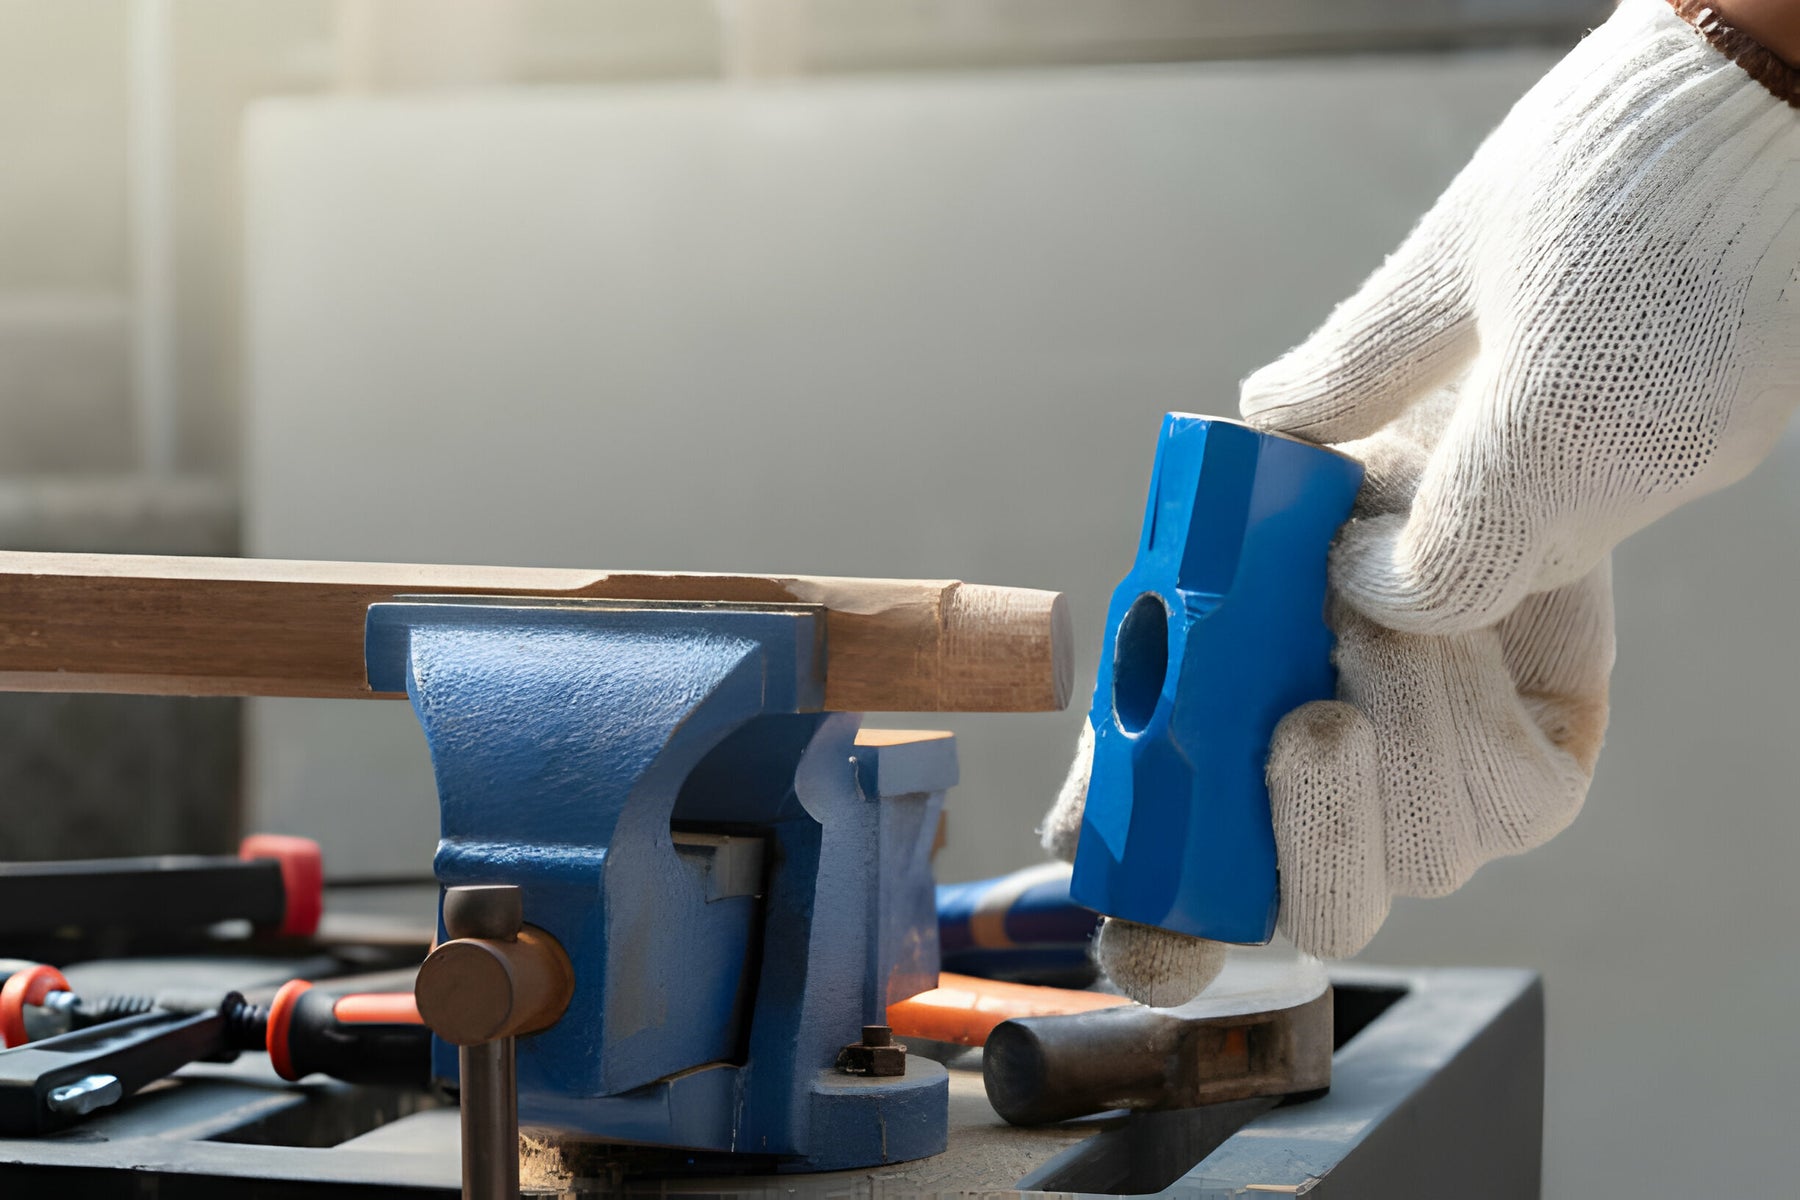
A bench vise is a mechanical device designed to hold workpieces securely in place during various tasks such as cutting, drilling, sanding, or shaping. It consists of a stationary jaw and a movable jaw that can be tightened together using a threaded screw mechanism. Bench vises come in different sizes and configurations to accommodate a wide range of projects.
The Purpose of a Bench Vise
The primary purpose of a bench vise is to provide stability and support while working on a workpiece. It allows you to clamp the material firmly, keeping it steady and preventing any unwanted movement. This enables you to work with greater precision and control, reducing the risk of accidents and mistakes.
Proper Use of a Bench Vise
To ensure the proper use of a bench vise, follow these guidelines:
- Selecting the Right Workpiece: Before using a bench vise, make sure the workpiece is suitable for clamping. Avoid using materials that are too small or fragile, as they may not withstand the pressure applied by the vise.
- Preparing the Workpiece: If necessary, clean and prepare the workpiece before clamping. Remove any debris, burrs, or sharp edges that could interfere with the vise's grip.
- Positioning the Workpiece: Place the workpiece between the jaws of the vise, ensuring that it is centered and aligned properly. Adjust the movable jaw accordingly to accommodate the size of the material.
- Applying the Right Amount of Pressure: Use the vise's threaded screw mechanism to tighten the jaws gradually. Avoid over-tightening, as it may damage the workpiece or strain the vise. Apply enough pressure to hold the material securely, but not so much that it deforms or cracks.
- Using Support Blocks: When working with delicate or irregularly shaped materials, consider using support blocks or soft jaws. These accessories can help distribute the clamping force evenly and prevent damage to the workpiece.
- Safety Precautions: Always wear appropriate safety gear, such as protective goggles and gloves, when operating a bench vise. Additionally, ensure that the vise is securely mounted to a stable work surface to prevent any accidents or instability during use.
By understanding the purpose and following these proper usage guidelines, you can maximize the effectiveness of your bench vise and enhance your overall woodworking or metalworking experience. Now that we have covered the basics, let's move on to the next section, where we will discuss common bench vise mistakes and how to avoid them.
Related Article: Proper Clamping Techniques
Common Bench Vise Mistakes and How to Avoid Them
In this section, we will explore some of the most common bench vise mistakes that people make and provide you with valuable tips on how to avoid them. By being aware of these pitfalls and implementing the suggested solutions, you can ensure a smoother and more efficient workflow while using your bench vise.
Over-tightening the Vise
One of the most prevalent mistakes when using a bench vise is over-tightening. Applying excessive force can lead to several issues, including damaging the workpiece, straining the vise mechanism, or even causing the vise to break. To avoid this mistake:
- Use controlled pressure: Apply pressure gradually and evenly when tightening the vise. Avoid using excessive force and ensure a secure grip without distorting the workpiece.
- Know the material limitations: Understand the strength and fragility of the material being clamped. Delicate or softer materials may require less pressure, while harder materials may need a bit more force. Practice and experience will help you develop a feel for the appropriate pressure.
Using the Wrong Type of Vise for the Task
Choosing the wrong type of vise for a specific task is another common mistake. Different bench vises are designed to handle different materials and workpiece sizes. Using an incompatible vise can compromise safety and limit your ability to work effectively. Here's how to avoid this mistake:
- Consider the material: Determine the type of material you will be working with most frequently. For woodworking projects, a woodworking vise with wooden jaws may be suitable, while a metalworking vise with hardened steel jaws would be better for metalworking projects.
- Evaluate the workpiece size: Ensure that the size of the bench vise is appropriate for the workpieces you typically handle. A vise with a larger jaw opening may be necessary for larger materials, while a smaller vise can suffice for smaller pieces.
- Research vise types: Familiarize yourself with the different types of bench vises available, such as front vises, end vises, or combination vises. Understand their features and capabilities to make an informed decision based on your specific needs.
Neglecting Regular Maintenance
Many vise users overlook the importance of regular maintenance, leading to subpar performance, decreased durability, and potential safety hazards. To avoid this mistake, incorporate these maintenance practices into your routine:
- Keep it clean: Regularly clean the vise jaws and other components to remove dust, debris, and any built-up residue. Use a brush and a suitable cleaning agent to ensure smooth operation.
- Lubricate moving parts: Apply a lubricant, such as machine oil or grease, to the vise's threaded screw and other movable parts. This reduces friction, prevents rust formation, and promotes smooth movement.
- Inspect for wear and damage: Routinely inspect the vise for any signs of wear, damage, or misalignment. Check the jaws, screws, and mounting hardware for any issues. Replace or repair any damaged parts promptly.
Improper Installation of the Bench Vise
Improper installation of a bench vise can lead to instability, reduced functionality, and safety hazards. Avoid this mistake by following these installation guidelines:
- Choose the right location: Select a sturdy and flat work surface for mounting the vise. Ensure that the bench or table can handle the weight and pressure exerted during use.
- Securely mount the vise: Use appropriate mounting hardware, such as bolts and nuts, to attach the vise to the work surface. Ensure a tight and secure fit to prevent any wobbling or movement.
- Proper alignment: Align the vise jaws parallel to each other for optimal performance. Use a square or a straightedge to verify alignment before tightening the mounting hardware.
By being mindful of these common bench vise mistakes and implementing the suggested solutions, you can significantly enhance your vise usage experience. In the next section, we will delve into the correct installation and alignment of a bench vise, providing you with step-by-step instructions and useful tips.
Related Article: Secure Your Bench Vise Properly: Common Mounting Mistakes to Avoid
Correct Installation and Alignment of Bench Vise
Proper installation and alignment of a bench vise are essential for its stability, functionality, and safety. In this section, we will guide you through the steps to correctly install and align your bench vise, ensuring optimal performance during your work.
Choosing the Correct Location for Installation
Before installing your bench vise, it's crucial to select the right location. Consider the following factors:
- Work surface stability: Ensure that the work surface, such as a workbench or table, is sturdy and can withstand the pressure and weight exerted during vise usage. Avoid flimsy or unstable surfaces that may compromise the vise's performance.
- Accessibility: Choose a location that provides convenient access to the bench vise. Ideally, it should be easily reachable and allow ample space for maneuvering and working comfortably.
- Lighting and ventilation: Opt for a well-lit area with proper ventilation to enhance visibility and promote a comfortable working environment.
Step-by-step Installation Process
Follow these steps to install your bench vise correctly:
- Gather the necessary tools: Ensure that you have the required tools on hand, such as a drill, appropriate drill bits, wrenches, and mounting hardware (bolts, washers, and nuts).
- Position the vise: Place the bench vise in the desired location on the work surface. Align it parallel to the edge of the surface, leaving enough space for the jaws to open and close without obstruction.
- Mark the mounting hole locations: Using a pencil or marker, mark the mounting hole locations on the work surface through the holes in the vise's mounting brackets. Double-check the alignment to ensure accuracy.
- Drill pilot holes: With an appropriate-sized drill bit, drill pilot holes at the marked locations on the work surface. The diameter of the pilot holes should match the size of the mounting hardware.
- Attach the vise: Place the vise back onto the work surface, aligning the mounting holes with the pilot holes. Insert the appropriate bolts through the mounting brackets and pilot holes, adding washers and nuts on the underside of the work surface.
- Tighten the mounting hardware: Using a wrench or socket set, tighten the nuts on the underside of the work surface securely. Ensure that the vise is firmly attached and does not wobble or move during operation.
Aligning the Vise Properly
Proper alignment of the bench vise is crucial for optimal performance. Follow these steps to align your vise correctly:
- Open the vise jaws: Loosen the vise's threaded screw mechanism to open the jaws completely.
- Place a straightedge or square against the jaws: Position a straightedge or square against the inside faces of the vise jaws. Ensure that the straightedge or square is long enough to span the entire width of the jaws.
- Adjust the alignment: Using a mallet or a soft-faced hammer, gently tap the vise jaws to adjust their alignment. Align them parallel to each other and perpendicular to the work surface.
- Tighten the vise jaws: Gradually tighten the vise's threaded screw mechanism to secure the alignment. Apply even pressure on both sides of the vise jaws to ensure a balanced grip.
- Check the alignment: Verify the alignment by repositioning the straightedge or square against the jaws. Ensure that the straightedge or square remains parallel to the vise jaws along their entire length.
By following these installation and alignment steps, you can ensure that your bench vise is securely mounted and properly aligned for efficient and accurate work. In the next section, we will discuss the importance of maintaining your bench vise and provide you with essential tips for its longevity.
Maintaining Your Bench Vise for Longevity
Regular maintenance is crucial for the longevity and optimal performance of your bench vise. In this section, we will discuss the essential maintenance practices that will keep your vise in top shape for years to come.
Regular Cleaning and Lubrication
Cleaning your bench vise regularly helps remove debris, dust, and other contaminants that can affect its performance. Follow these steps for effective cleaning:
- Disassemble the vise (if applicable): If your vise allows for disassembly, carefully remove the jaws and any other removable parts.
- Clean the components: Use a brush or compressed air to remove loose dirt and debris from all the vise components. Pay special attention to the jaws, screws, and other moving parts.
- Use a cleaning agent: Apply a suitable cleaning agent, such as a degreaser or mild soap solution, to a cloth or brush. Thoroughly clean all surfaces, including the jaws and screws, to remove any stubborn dirt or grime.
- Rinse and dry: Rinse the components with clean water to remove any residue from the cleaning agent. Dry them thoroughly with a clean cloth or allow them to air-dry completely before reassembly.
- Lubricate the moving parts: Apply a lubricant, such as machine oil or grease, to the vise's threaded screw and other movable parts. This lubrication reduces friction, prevents rust formation, and ensures smooth operation. Follow the manufacturer's recommendations for the type and frequency of lubrication.
Related Article: The Importance of Regular Bench Vise Lubrication
Inspecting for Wear and Tear
Regular inspections help identify any signs of wear, damage, or misalignment in your bench vise. Perform these checks periodically:
- Check the jaws: Examine the vise jaws for any signs of wear, such as dents, chips, or uneven surfaces. If necessary, replace the jaws to maintain a secure grip on workpieces.
- Inspect the screws and threads: Inspect the vise's threaded screw and other screws for any signs of damage or excessive wear. If you notice any issues, consider replacing the worn or damaged screws to ensure smooth operation.
- Verify alignment: Periodically check the alignment of the vise jaws using a straightedge or square. If you notice any misalignment, follow the alignment steps mentioned earlier to adjust and re-align the jaws.
- Inspect mounting hardware: Check the mounting hardware, such as bolts, washers, and nuts, for tightness and any signs of corrosion or damage. Replace any corroded or damaged hardware to maintain a secure and stable vise installation.
Replacing Damaged Parts
Over time, certain components of your bench vise may wear out or get damaged. It's essential to replace these parts to ensure the vise's functionality and safety. Consider the following:
- Refer to the manufacturer's guidelines: Consult the manufacturer's documentation or website for information on replacement parts specific to your bench vise model.
- Order genuine parts: Purchase replacement parts from reputable sources or directly from the vise manufacturer to ensure compatibility and quality.
- Follow replacement instructions: Follow the manufacturer's instructions or guidelines for replacing the damaged parts. Take note of any specific tools or techniques required for the replacement process.
By following these maintenance practices and promptly addressing any issues, you can extend the lifespan of your bench vise and maintain its optimal performance. In the next section, we will guide you through the process of choosing the right bench vise for your specific needs.
Choosing the Right Bench Vise for Your Needs
Choosing the right bench vise is crucial for ensuring that it meets your specific needs and enhances your workflow. In this section, we will explore the different types of bench vises available, factors to consider when making a selection, and provide recommendations based on various use cases.
Understanding Different Types of Bench Vises
- Woodworking Vise: Designed specifically for woodworking projects, these vises typically have wooden jaws that provide a firm grip without damaging the workpiece. They are suitable for clamping wooden materials during cutting, shaping, or joinery tasks.
- Metalworking Vise: Metalworking vises are built to withstand the demands of working with metal. They often feature hardened steel jaws that can hold metal workpieces securely. These vises are suitable for tasks such as cutting, filing, grinding, or bending metal.
- Multi-Purpose Vise: As the name suggests, multi-purpose vises offer versatility and can handle a variety of materials and projects. They usually have interchangeable jaws or a combination of materials, such as metal and rubber, to accommodate different workpieces.
- Machinist Vise: Machinist vises are designed for precision work, commonly used in metalworking or machining applications. They often feature more refined mechanisms for precise clamping and alignment, allowing for accurate drilling, milling, or shaping of metal parts.
Factors to Consider When Choosing a Bench Vise
When selecting a bench vise, consider the following factors:
- Usage: Determine the primary tasks and materials you will be working with. Consider whether you need a vise specifically designed for woodworking, metalworking, or a multi-purpose vise.
- Jaw Size and Opening Capacity: Assess the size of the workpieces you typically handle. Ensure that the vise's jaw size and opening capacity are adequate to accommodate your projects.
- Construction and Durability: Look for a vise made from high-quality materials, such as cast iron or steel, for durability and longevity. Consider factors like weight, sturdiness, and overall build quality.
- Mounting Options: Check the vise's mounting options to ensure compatibility with your work surface. Some vises may require specific mounting configurations or additional accessories for installation.
- Price and Budget: Set a budget range based on your requirements and the level of quality you desire. Compare prices and features to find the best balance between affordability and performance.
Recommendations for Different Use Cases
Here are some recommendations based on different use cases:
- Woodworking Projects: Consider a woodworking vise with wooden jaws, such as the "ABC Woodworker's Vise," known for its sturdy construction and smooth clamping action.
- Metalworking Projects: Look for a metalworking vise with hardened steel jaws, like the "XYZ Machinist Vise," which offers excellent gripping power and durability for metalworking tasks.
- Versatility and Multi-Purpose: Opt for a multi-purpose vise like the "123 Universal Vise," which features interchangeable jaws for accommodating various materials and projects.
- Precision Work and Machining: For precision work, the "DEF Precision Machinist Vise" is an excellent choice. It offers fine-tuned adjustments and high clamping accuracy.
Remember to research specific models, read reviews, and consider your unique requirements before making a final decision.
By considering the type of vise, jaw size, construction, mounting options, and your specific budget, you can choose a bench vise that aligns with your needs and enhances your workmanship. With the right vise by your side, you can tackle projects with confidence and precision.
In conclusion, we've covered the basics of bench vise usage, common mistakes to avoid, installation and alignment processes, maintenance tips, and guidance for selecting the right bench vise. By following these tips and implementing best practices, you'll be well-equipped to make the most out of your bench vise and achieve outstanding results in your woodworking or metalworking endeavors.
Related Topics
Top 10 Best Tap and Die Sets in 2025
Whether you’re a professional mechanic, DIY enthusiast, or someone who occasionally needs to fix ...
Read More
How to Use Pliers and Tweezers Effectively in Computer Repairs
When it comes to computer repairs, having the right pliers is absolutely crucial for ensuring tha...
Read More
Magnetic vs. Non-Magnetic Tools: Which Are Better for Computer Repair?
When it comes to fixing computers, the tools available in your computer repair tool kit can reall...
Read More