How to Remove Staples: Tips and Tricks
Staples are an essential tool for holding various materials together, such as paper, fabric, or even wood. However, removing them can be a daunting task, especially if you don't have the right tools or knowledge to do so
With this guide, DIY enthusiasts, handymen, and homeowners alike can tackle even the most stubborn staples with ease and confidence.
Table of Contents:
- Types of Staple Removers
- Different Kinds of Staples
- Safety Precautions
- Preparing the Work Area for Staple Removal
- Minimizing Damage During Staple Removal
- Removing Staples from Delicate Materials
- Methods for Removing Staples
- Removing Different Types of Staples
- Conclusion
his comprehensive guide aims to provide DIY enthusiasts, handymen, and homeowners with all the information they need to successfully remove staples without causing damage or injury.
Types of Staple Removers
Before diving into the techniques for removing staples, it's important to understand the different types of staple removers available. Each type is designed to handle specific types of staples, making the removal process easier and more efficient.
- Claw Staple Remover: This is the most common type of staple remover. It features two curved metal prongs that slide under the staple, gripping and pulling it out when the handle is squeezed. This type of staple remover is ideal for removing staples from paper or thin materials.
- Pinch Staple Remover: This remover works by pinching the staple's legs together, allowing you to easily lift it out of the material. This type is best suited for removing larger staples or those embedded in thicker materials.
- Lever Staple Remover: This tool operates on a lever mechanism, using its curved blade to lift the staple out of the material. Lever staple removers are ideal for heavy-duty jobs or when dealing with deeply embedded staples.
Different Kinds of Staples
Understanding the various types of staples can help you choose the right tool and technique for their removal. In this section, we'll explore some common staples and tacks used in different applications.
Paper Staples
These are the most common type of staples, primarily used for binding sheets of paper together. They come in various sizes, with the standard size being 1/4 inch or 6mm in leg length.
Upholstery Staples
Upholstery staples are used to secure fabric to furniture frames. These staples are typically longer and stronger than paper staples, with leg lengths ranging from 1/4 inch to 9/16 inch. They are often made of more durable materials, such as stainless steel or heavy-duty wire.
Carpet Staples
Carpet staples are specifically designed for securing carpets to subfloors. They are generally U-shaped and feature wider crowns to hold the carpet in place. The leg length of carpet staples varies depending on the thickness of the carpet and the subfloor material.
Construction Staples
Construction staples are used in various building and woodworking applications, such as attaching roofing felt, house wrap, or insulation. These heavy-duty staples are made of thicker metal and have longer legs to penetrate deeper into the materials. They can range in size from 1/2 inch to 2 inches in leg length.
Cable Staples
Cable staples are designed to secure electrical cables and wires to walls, ceilings, and other surfaces. They feature a rounded crown to prevent damage to the cable's insulation and can be made of plastic, metal, or a combination of both. The size of cable staples depends on the diameter of the cable being secured.
Related Article: What are Narrow Crown Staples
Safety Precautions
Before attempting to remove any staples, it's crucial to take some safety precautions to avoid injury or damage to the material. Here are some guidelines to follow:
Wear protective gear: Always wear gloves to protect your hands from sharp edges and potential slips. Safety goggles can also be helpful to prevent debris from entering your eyes.
Work on a stable surface: Ensure that the material you're working on is placed on a flat, stable surface to avoid accidental slips or damage.
Keep the area clean: Make sure your workspace is free of clutter and debris, as this can cause accidents or make it harder to locate the staples you need to remove.
Preparing the Work Area for Staple Removal
The initial step in any project involving staple removal is to adequately prepare the work area. This preparation is crucial not only for efficiency but also to ensure safety and minimize the risk of damage to both the workspace and the materials involved. A well-prepared work area offers a controlled environment that can accommodate various types of staple removal tasks, from upholstery refurbishing to woodworking projects.
By setting up your workspace with the right tools and protective materials, you can streamline the staple removal process, making it smoother and more manageable. Proper preparation is the precursor to success, laying the groundwork for a streamlined operation that ensures both safety and precision during the staple removal process.
Selecting the Right Tools
- Essential Tools for Staple Removal: Begin by assembling all necessary tools. This includes staple removers, needle-nose pliers, flat-head screwdrivers, and potentially a pair of safety gloves to protect your hands. Having these tools within easy reach ensures a seamless staple removal process.
- Tool Quality and Maintenance: Invest in high-quality tools that are specifically designed for staple removal. Well-maintained tools with sharp, clean edges are more effective and reduce the effort required to remove staples, thus minimizing potential damage to the material.
Setting Up the Workspace
- Protective Coverings: Lay down a soft cloth or a piece of cardboard over your work surface to protect it from scratches and damage that might occur during the staple removal process.
- Organized Layout: Arrange your tools in an organized manner around your workspace. This setup should provide easy access to your tools without cluttering the area, ensuring a smooth workflow and reducing the risk of accidental damage or injury.
Minimizing Damage During Staple Removal
Removing staples without causing damage to the underlying material is a delicate task that requires patience, the right technique, and the appropriate tools. Whether you're working on a valuable piece of furniture or dealing with fragile materials, the goal is to extract the staples cleanly without leaving marks, tears, or other forms of damage.
Understanding the nuances of the materials you're working with and applying gentle but effective methods are key to achieving a pristine finish. Mastery of these techniques transforms the mundane task of staple removal into an art form, preserving the integrity and aesthetics of the materials at hand.
Gentle Techniques for Effective Removal
- Leverage and Precision: Utilize the leverage provided by your tools to gently ease staples out of the material. Start by carefully inserting the flat end of a staple remover or a small flat-head screwdriver under the crown of the staple and slowly rock the tool back and forth to lift the staple without tearing the material.
- Working with Delicate Materials: When dealing with particularly delicate materials, consider using a thin piece of cardboard or plastic as a buffer between your tool and the material to distribute the pressure more evenly and reduce the risk of puncture or tearing.
Avoiding Common Pitfalls
- Rushing the Process: Patience is paramount when removing staples to avoid damaging the material. Rushing can lead to forceful actions that increase the risk of tears or cracks.
- Neglecting Tool Condition: Dull or damaged tools are more likely to slip or require excessive force to operate, leading to potential damage. Regularly inspect and maintain your tools to ensure they are in optimal condition for the task at hand.
Removing Staples from Delicate Materials
Working with delicate materials demands a heightened level of care and precision during staple removal. Delicate fabrics, thin woods, and vintage items can easily suffer from mishandling, resulting in irreversible damage. Adaptability in technique and a thorough understanding of the material's properties are essential components of successful staple removal from such sensitive items.
This nuanced approach not only safeguards the materials but also enhances the quality of the work, ensuring that the beauty and condition of delicate items are maintained throughout the restoration or refurbishment process.
Adjusting Techniques for Different Materials
- Fabrics and Upholstery: Use a blunt-edged staple remover and gently wiggle it under each staple. If resistance is met, apply minimal additional force to avoid tearing the fabric.
- Thin Wood and Veneers: Protect the surface around the staple with a thin metal spatula or a piece of hard plastic to prevent scuffing or gouging the wood as you pry the staple out.
Special Considerations for Antique Items
- Assessing Risk and Value: Before attempting to remove staples from antique items, assess the potential risk of damage against the item's value. In some cases, consulting a professional restorer before proceeding may be advisable.
- Minimizing Impact: For antiques, use the least invasive method possible. Opt for tools that spread pressure widely, such as wide-bladed staple removers, and work slowly to minimize stress on the material.
Methods for Removing Staples
Now that you know the types of staple removers and have taken the necessary safety precautions, it's time to explore the various methods for removing staples. Below are four common techniques, each with step-by-step instructions.
Using a Staple Remover
- Choose the appropriate staple remover for the type of staple and material you're working with.
- Position the staple remover's prongs or blade under the staple's crown (the top part that connects the legs).
- Gently apply pressure to the handle of the staple remover, causing the prongs or blade to lift the staple upwards.
- Continue applying pressure until the staple is fully removed from the material.
- Carefully dispose of the removed staple to avoid injury.
Using Pliers
- Choose a pair of needle-nose or flat-nose pliers, depending on the size and location of the staple.
- Grip one leg of the staple with the pliers, as close to the material as possible.
- Gently pull the staple leg upwards while twisting the pliers slightly to loosen the staple from the material.
- Repeat steps 2 and 3 for the other staple leg.
- Once both legs are loosened, use the pliers to grip the crown of the staple and carefully pull it out.
Using a Flathead Screwdriver
- Select a flathead screwdriver with a head size that can easily fit under the staple's crown.
- Carefully slide the screwdriver under the crown, ensuring it is positioned between the staple and the material.
- Gently apply pressure to the screwdriver handle, using a rocking motion to lift the staple out of the material.
- Once the staple is loosened, use your fingers or pliers to fully remove it.
Using a Butter Knife
- Select a butter knife with a thin, flexible blade.
- Slide the blade under one leg of the staple, as close to the material as possible.
- Gently lift the staple leg upward, using a rocking motion if necessary.
- Repeat steps 2 and 3 for the other staple leg.
- Once both legs are loosened, use your fingers or pliers to grip the crown of the staple and carefully pull it out.
Removing Different Types of Staples
Different types of staples may require specialized techniques for effective removal. Here are some tips for dealing with various staple situations:
- Paper Staples: When removing staples from paper, take care not to tear the paper by gently lifting the staple with a staple remover or other appropriate tool.
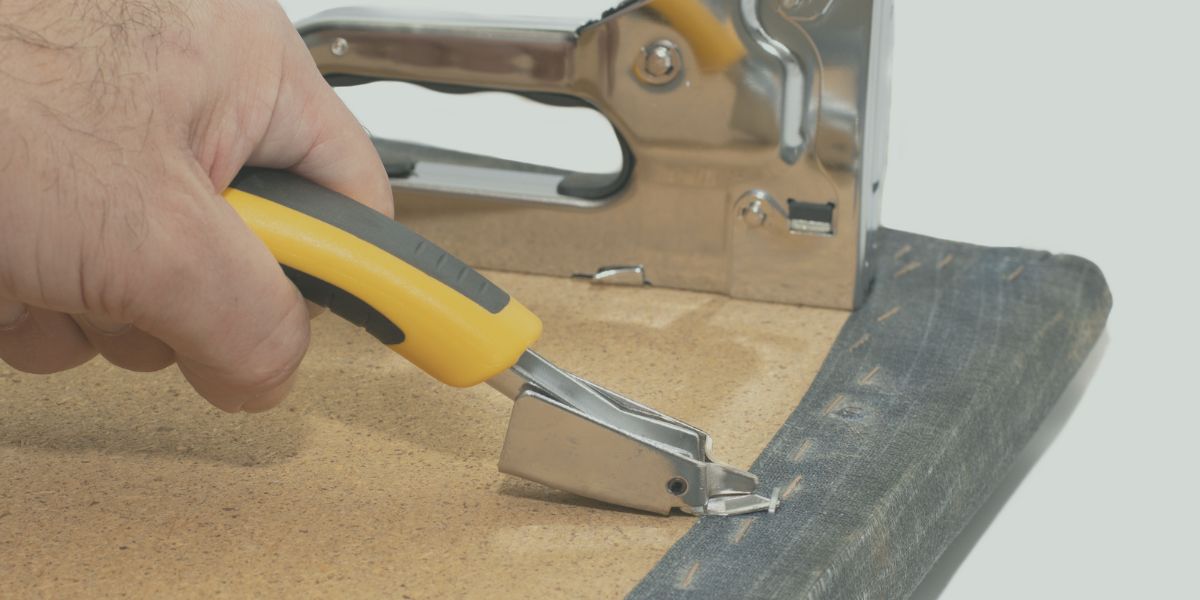
- Upholstery Staples: These staples are typically larger and embedded deeper in the material. Using pliers or a lever staple remover can be helpful for these situations.
- Carpet Staples: Carpet staples may be more challenging to remove due to their location. Use a flathead screwdriver to lift the staple's crown before removing it with pliers or another suitable tool.
- Heavy-Duty Staples: For staples that are deeply embedded or made of thicker metal, you may need to use a combination of tools and techniques to effectively remove them.
Conclusion
Removing staples can be a challenging task, but with the right tools and techniques, anyone can become proficient at it. By choosing the appropriate method and tool for the type of staple and material, taking safety precautions, and practicing patience and precision, you can successfully remove staples without causing damage or injury.
Related Topics
A Step-by-Step Guide to Using Tap and Die Sets Safely
This guide will help you understand how to use tap and die sets safely and effectively. Whether y...
Read More
How to Choose the Right Tap and Die Set for Your Needs
Choosing the right tap and die set can be a daunting task, especially if you're new to threading ...
Read More
Maintenance Tips for Prolonging the Life of Your Tap and Die Set
Maintaining your tap and die set is essential for ensuring its longevity and effectiveness. These...
Read More