Automotive Specialty Tools: When and How to Use Them
In the world of automotive repair and maintenance, having the right tools for the job can make all the difference. Automotive specialty tools are designed to tackle specific tasks with precision and efficiency, but knowing when and how to use them is key to success.
In this blog post, we will explore the importance of automotive specialty tools, the common types available, and how to properly utilize them in various automotive applications. Whether you're a seasoned mechanic or a DIY enthusiast, understanding these automotive tools and their functions can elevate your automotive projects to the next level.
When to Use Automotive Specialty Tools
Knowing when to utilize automotive specialty tools is crucial for efficient and effective repairs and maintenance. In this section, we will explore the various scenarios and indicators that signal the need for specialty tool usage. By understanding the right time to employ these tools, you can maximize their benefits and achieve better results in your automotive projects.
Identifying the Right Time for Using Each Tool
- Diagnostic Scan Tool: A diagnostic scan tool is typically used when there is an illuminated check engine light (CEL) or when specific system malfunctions are observed. It helps pinpoint the underlying cause of the issue by reading and interpreting DTCs and live data.
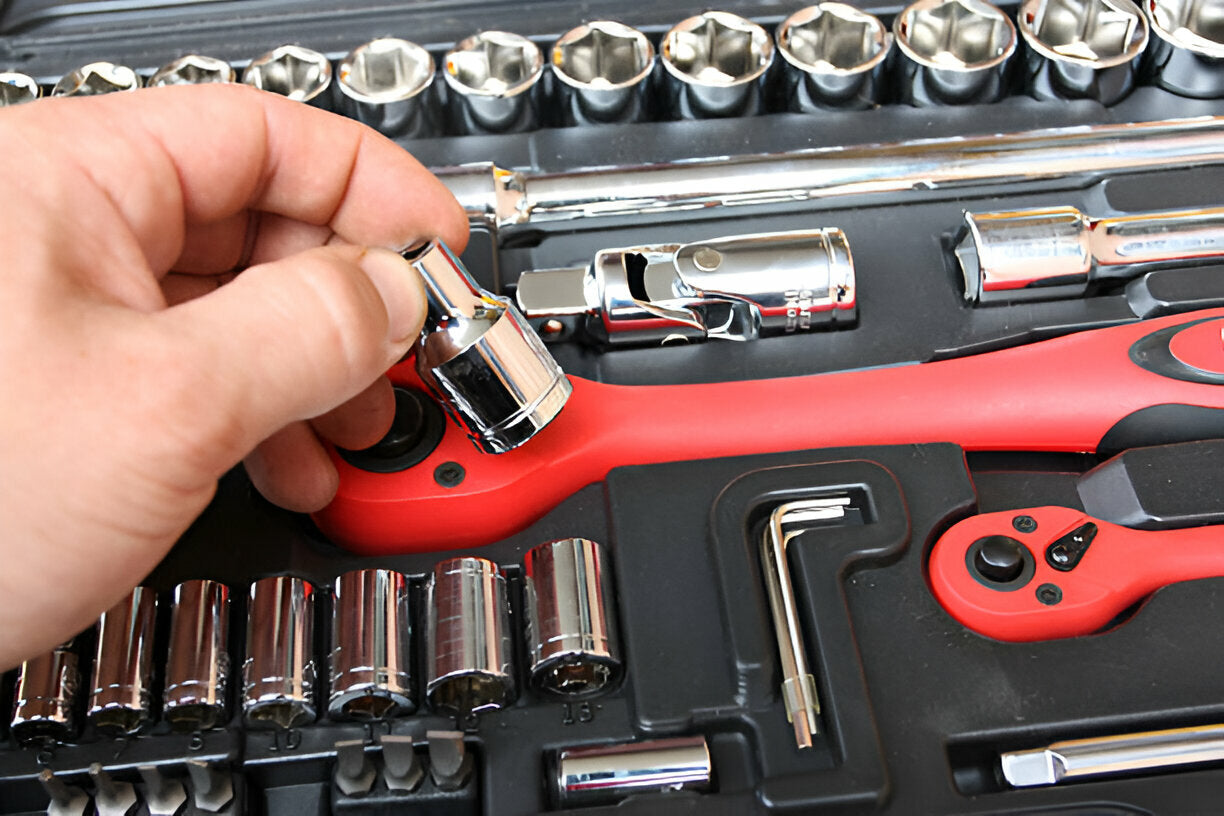
- Torque Wrench: A torque wrench should be used whenever precise torque specifications are specified by the vehicle manufacturer. This includes tasks such as tightening cylinder head bolts, connecting rod bolts, or wheel lug nuts.
- Impact Wrench: An impact wrench is commonly utilized for tasks that involve tightening or loosening large and stubborn fasteners, such as wheel lug nuts, suspension components, or engine mounts.
- Compression Tester: When experiencing engine-related problems such as misfires, loss of power, or excessive oil consumption, a compression tester can help diagnose issues with the engine's compression by measuring cylinder pressure.
- Brake Bleeder Kit: It is advisable to use a brake bleeder kit when performing brake system maintenance or when there are symptoms of air in the brake lines, such as spongy brake pedal feel or poor brake performance.
- Ball Joint Separator: A ball joint separator is essential when replacing ball joints, control arms, or tie rod ends. It allows for the separation of the ball joint from the control arm or steering knuckle without damaging the components.
- Oil Filter Wrench: An oil filter wrench should be used whenever removing or installing an oil filter. It provides a secure grip on the filter, allowing for easier removal and installation.
- Spark Plug Socket: When performing spark plug replacements or inspections, a spark plug socket ensures a snug fit around the spark plug, facilitating proper removal and installation without damaging the spark plug.
- Timing Light: A timing light is used when adjusting ignition timing or diagnosing timing-related issues. It is especially important during timing belt replacements, engine tune-ups, or troubleshooting engine performance problems.
- Fuel Pressure Gauge: When experiencing fuel-related issues such as rough idle, poor acceleration, or fuel system malfunctions, a fuel pressure gauge can help diagnose problems by measuring the fuel pressure in the system.
- Bearing Puller: A bearing puller should be used when replacing bearings or performing repairs that require the removal of bearings from shafts or housings. It provides a safe and efficient method for extracting bearings without causing damage.
- Wire Terminal Removal Tool: When repairing electrical systems or replacing faulty connectors, a wire terminal removal tool allows for the safe removal of electrical terminals from connectors without damaging the wires or connectors.
- Panel Removal Tool: Whenever removing trim panels, door panels, or interior components, a panel removal tool prevents damage by safely prying or releasing clips without scratching or breaking the panels.
- Oxygen Sensor Socket: An oxygen sensor socket is used when removing or installing oxygen sensors. Its design accommodates the wiring harness, allowing for easy and damage-free sensor removal and installation.
- Harmonic Balancer Puller: When performing engine repairs or replacements, a harmonic balancer puller is used to safely remove the harmonic balancer from the crankshaft, avoiding damage to both the balancer and the engine.
By identifying the specific situations that call for the use of automotive specialty tools, you can ensure that you are using the right tool for the job. This will improve efficiency, accuracy, and the overall quality of your automotive repairs and maintenance. In the next section, we will delve deeper into the role of specialty tools in preventive maintenance and how they can contribute to prolonging the lifespan of your vehicle.
Related Article: Innovative Automotive Tool Uses: Unconventional Ways to Use Your Tools
How to Use Automotive Specialty Tools
Knowing how to properly use automotive specialty tools is essential for achieving accurate and safe results in your automotive projects. In this section, we will provide a step-by-step guide on using each tool, along with safety precautions and troubleshooting tips. Whether you're a professional mechanic or a DIY enthusiast, understanding the correct usage techniques will help you make the most of your automotive specialty tools.
Step-by-Step Guide on Using Each Tool
- Diagnostic Scan Tool:
- Connect the scan tool to the vehicle's OBD-II port, typically located under the dashboard.
- Follow the on-screen prompts to establish communication with the vehicle's onboard computer system.
- Retrieve and analyze diagnostic trouble codes (DTCs) to identify the source of the problem.
- Use live data and system tests to further diagnose and troubleshoot issues.
- Torque Wrench:
- Select the appropriate socket size for the fastener you need to tighten or loosen.
- Set the desired torque value on the torque wrench, ensuring it matches the specifications provided by the vehicle manufacturer.
- Apply force to the handle of the torque wrench in a controlled manner until you hear or feel the torque wrench click, indicating that the desired torque has been reached.
- If loosening a fastener, turn the handle counterclockwise until the fastener is free.
- Impact Wrench:
- Attach the appropriate socket to the impact wrench.
- Ensure the impact wrench is set to the correct direction (clockwise for tightening, counterclockwise for loosening).
- Position the socket onto the fastener and firmly press the trigger to engage the impact mechanism.
- Allow the impact wrench to do the work, applying steady pressure until the fastener is tightened or loosened.
- Compression Tester:
- Remove the spark plugs from the engine.
- Thread the compression tester into the spark plug hole for the cylinder you want to test.
- Disable the ignition system to prevent the engine from starting during the compression test.
- Crank the engine several times using the starter or pull cord, and observe the compression gauge to determine the cylinder's compression pressure.
- Brake Bleeder Kit:
- Locate the brake bleeder valve on the brake caliper or wheel cylinder.
- Attach the appropriate adapter from the brake bleeder kit to the bleeder valve, ensuring a tight seal.
- Connect the other end of the kit to the hand pump or vacuum pump.
- Open the bleeder valve and operate the pump according to the manufacturer's instructions to remove air from the brake system.
- Ball Joint Separator:
- Position the ball joint separator between the control arm and the steering knuckle.
- Apply force to the separator using a hammer, wrench, or dedicated tool.
- Continue applying force until the ball joint separates from the control arm or steering knuckle.
- Oil Filter Wrench:
- Select the appropriate size oil filter wrench that fits securely around the oil filter.
- Position the wrench onto the oil filter and apply force in a counterclockwise direction to loosen and remove the filter.
- Once the filter is removed, clean the filter mounting surface and apply a thin coat of oil to the rubber gasket of the new filter.
- Hand-tighten the new filter onto the mounting surface, then use the wrench to give it an additional quarter turn to secure it.
- Spark Plug Socket:
- Select the appropriate size spark plug socket that fits the spark plug.
- Insert the spark plug socket onto the spark plug and ensure it is fully engaged.
- Use a ratchet or extension bar to turn the spark plug counterclockwise to loosen and remove it.
- When installing a new spark plug, hand-tighten it until it is snug, then use the socket to give it an additional half turn to ensure proper seating.
These are just a few examples of how to use automotive specialty tools. Always refer to the manufacturer's instructions for each specific tool you are using to ensure proper usage and safety.
By following these maintenance practices, you can extend the lifespan of your automotive specialty tools and ensure that they perform at their best when you need them. Taking care of your tools not only saves you time and money but also contributes to the safety and efficiency of your automotive projects.
Related Article: Selecting Quality Automotive Tools: What to Look for Before You Buy
Related Topics

Top 5 Uses for Tap and Die Sets in Everyday Repairs
When it comes to versatile tools for repair and maintenance, Tap and Die Sets are among the most ...
Read More
What Are Tap and Die Sets? A Beginner’s Guide
When it comes to threading bolts, rods, or holes, Tap and Die Sets are essential tools for profes...
Read More
Top 10 Best Tap and Die Sets in 2025
Whether you’re a professional mechanic, DIY enthusiast, or someone who occasionally needs to fix ...
Read More